Hello everybody, it’s Jim, welcome to my recipe page. Today, I’m gonna show you how to prepare a distinctive dish, hyderabadi dum chicken biryani. One of my favorites food recipes. This time, I’m gonna make it a little bit tasty. This is gonna smell and look delicious.
Hyderabadi Chicken Dum Biryani is a World famous Dish, it is made using chicken which is marinated then cooked and then is added to cooked rice and again. Chicken marinated with special spices and cooked along with basmati rice. If you want to have Hyderabadi Dum Biryani in the Bay Area, this is the place to be!!!
Hyderabadi dum chicken biryani is one of the most favored of current trending foods on earth. It is simple, it is quick, it tastes delicious. It’s appreciated by millions every day. Hyderabadi dum chicken biryani is something which I’ve loved my entire life. They’re fine and they look fantastic.
Recipe of Hyderabadi dum chicken biryani
To begin with this recipe, we must first prepare a few ingredients. You can cook hyderabadi dum chicken biryani using 33 ingredients and 16 steps. Here is how you can achieve it.
Ingredients
The ingredients needed to make Hyderabadi dum chicken biryani:
- Take 1 kilo chicken, cut into medium size pieces
- Take 3 cups Basmati rice
- Make ready Handful chopped coriander leaves
- Get Handful chopped mint leaves
- Get 3 tablespoons Ghee (clarified butter)
- Prepare For marinating chicken
- Get 5 cloves crushed garlic
- Get 1 cm thick crushed ginger
- Make ready 1 tablespoon red chilli powder
- Take 2 teaspoons coriander powder
- Make ready 2 teaspoons garam masala
- Take 1 teaspoon turmeric powder
- Make ready 1-2 teaspoon freshly ground black pepper
- Make ready 4-5 whole black peppercorns
- Make ready 4-5 cardamoms
- Get 2 whole star anise
- Prepare 1 piece Cinnamon stick
- Prepare 2-3 bay leaves
- Take 2 large onions thinly sliced and fried
- Make ready 4 green chillies, cut into small pieces
- Get Half cup of plain yogurt
- Prepare 2-3 tablespoons vegetable oil
- Make ready Half lemon juice
- Prepare to taste Salt
- Get For cooking rice
- Prepare 4-5 whole black peppercorns
- Take 4-5 cardamoms
- Get 1 piece Cinnamon
- Make ready 2-3 bay leaves
- Prepare 1 dried lemon
- Get 1 tablespoon vegetable oil
- Get Water
- Get Salt
When the biryani is cooked on dum, while you open the. Chicken dum biryani recipe with step by step pictures. Dum biryani, a classic dish of the Mughal Nizams is an eye-catching aromatic rice loved by all. We all love biryani, but when it comes to preparing them most of us, step back because of the tedious process.
Instructions
Steps to make Hyderabadi dum chicken biryani:
- Prepare the chicken marinade: - Mix all the ingredients for the marinade along with the chicken. It would be easier to first mix the dry ingredients with the chicken and then add the yogurt, lemon juice and vegetable oil. Set it aside for an hour or so.
- Transfer it to a pot in which you plan to prepare the biryani. The chicken will remain at the bottom of the pot, on top of which we will be later adding the rice.
- To cook the rice, first take a large pot with 3-4 litres of water.
- Add the ingredients for cooking rice and bring it to a boil. The salt level of the water should be such that it tastes quite salty. This is fine because we will be later draining the water and throwing it away, so the extra salt is to compensate that.
- In the meantime wash the basmati rice in cold water to get rid of the starch. If there is too much starch left, the cooked rice will tend to be sticky which is not what we want for the biryani.
- Add the washed rice to the water, and cook it until its cooked about 80-90%.
- Drain the almost cooked rice. Now without loosing too much time follow the rest of the steps.
- Get back to the pot with the marinated chicken at the bottom. Add the first half of the chopped coriander and mint leaves on top of the chicken.
- Now add first half of the drained rice on top of it.
- Add the remaining half of the chopped leaves on top of the rice.
- Add first half of the ghee/clarified butter. It will be easier if the ghee is in its liquid form.
- Add the remaining half of the rice.
- Add the remaining half of the ghee on top of the rice.
- Close the pot with a lid. Make sure that the lid fits properly. We want to lock as much as heat inside the pot without letting it leak outside
- Let it cook on high heat for the first 10 minutes and another 20-25 minutes on low-medium heat
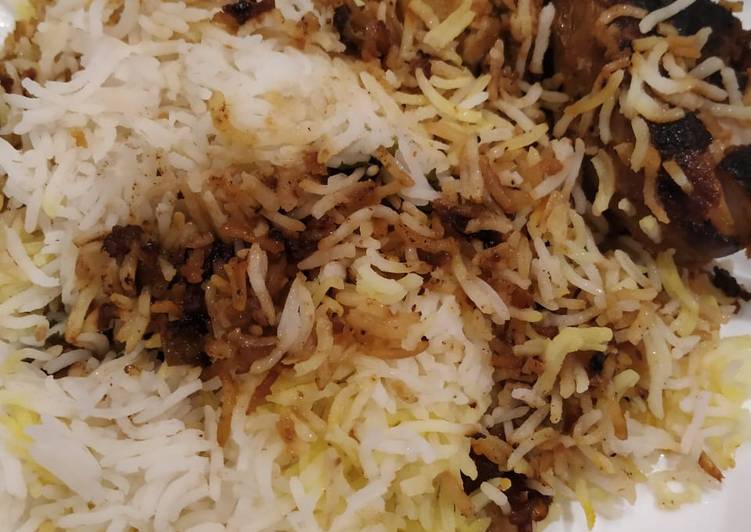
- Your biryani is now ready to be served. Biryani tastes the best if you consume it immediately. Also when you serve you want a mix of the chicken and spicy rice from the bottom with plain rice from the top.
But trust me, once you learn. Chicken Biryani is one of the most sought after biryani and in general I feel Biryani is something that has many admirers. At least the popularity of this healthy Veg Biryani and Out of all the popular types of biryani recipes, Hyderabadi dum biryani is my favorite mainly because it's more flavourful. Hyderabadi Chicken Dum Biryani is a delicious Indian recipe served as a Main. Find the complete instructions on Bawarchi.
As simple as that Steps to Prepare Hyderabadi dum chicken biryani
So that’s going to wrap this up with this exceptional food hyderabadi dum chicken biryani recipe. Thank you very much for your time. I am confident that you can make this at home. There is gonna be interesting food at home recipes coming up. Remember to bookmark this page in your browser, and share it to your loved ones, friends and colleague. Thank you for reading. Go on get cooking!
Print this page